![]()
![]()
This topic explains how to import data into Morningstar Office from Microsoft Excel. Excel can be used to establish new accounts, or to bring additional transactional history into accounts that have been previously established. This includes accounts linked to other custodian import sources, such as Schwab or Fidelity. You might also need to import from Excel if your custodian is not supported in Morningstar Office.
You can import the following content from Excel:
Transactions, Securities, Prices, and Client Data
Investment Notes, and
Before you begin importing, please review the Preparing to Import Data into Morningstar Office topic.
How can I save time with Morningstar’s Back Office Services team?
For advisors who wish to save the time and trouble of daily importing and reconciliation, Morningstar is pleased to offer the option of outsourcing these tasks to our Back Office Services team. Working directly with you to define and meet your needs, Morningstar’s BOS team will operate as an extension of your internal staff, under your direction and terms. Contact your Client Solutions Consultant for more information on this service.
Selecting Microsoft Excel Interface Types
Before you can begin importing from Microsoft Excel into Morningstar Office, you must select the import interfaces you plan to use in your practice.
This section explains how to import transactions from Microsoft Excel into Morningstar Office. The following topics are covered:
importing Buy transactions that act as reinvestments from Fidelity Wealth Central
the minimum data points are required to import transactions from Excel
the names of the transaction types used in Morningstar Office
how to use the Import blotter.
How can I import Buy transactions that act as reinvestments from Fidelity Wealth Central through Excel?
Click here  for more information on this topic.
What data points does Morningstar Office recognize when importing from Excel?
To import transactional data from Excel, you must be sure the spreadsheet is correctly formatted. Morningstar Office can read the following data points from Excel:
|
Account Number |
Net Amount |
Security Type |
|
Account Name |
Original Date* |
Settlement Date* |
|
Client Name |
Other Fee |
Shares |
|
Commission |
Price per Share |
Ticker |
|
Cost Basis per Share |
Security ID |
Transaction Date* |
|
Gross Amount |
Security Name |
Transaction Type |
Note: When you import transactions, Morningstar Office asks for the format you used for all date fields. Therefore, be sure to use a consistent format for every date field you enter in Excel. That is, do not switch from using mm/dd/yyyy to dd/mm/yyyy. Use one format only.
Security Name is not a required field, but if you leave it blank in the spreadsheet, this will cause a soft warning in Morningstar Office when you import, since it will seem to not know the security based on the Ticker symbol and Security Type. When you post the data to your practice, though, the system will correctly fill in the Security Name field, but this can be confusing at the time you see it in the blotter.
If your custodian does not provide a spreadsheet for import, click here to open an Excel template designed to help with the process of importing transactions. The highlighted headers indicate the fields that are either required or recommended to produce the best results. Additional instructions for each column can be found by clicking within a cell The Gross Amount (Check) column contains a formula to indicate whether the data has been entered correctly in the Price, Shares, and Gross Amount columns. This column can be ignored if you are not entering the Gross Amount in the spreadsheet and the Gross Amount is equal to the Net Amount.
What data points are required to import transactions from Excel?
|
Data Point |
Comment |
|
Account Number |
This allows you to tie accounts from Excel to those imported from a custodian. |
|
Client Name |
If a client does not exist in Morningstar Office, a record will be created. If you omit the client’s name from the spreadsheet, the name of the spreadsheet file will be used in its place. |
|
Account Name |
Technically, you can import transactions without an account name being included in the spreadsheet. However, if you do this Morningstar Office will automatically use the Client Name as the Account Name on the Accounts page under the Portfolio Management tab. |
|
Transaction Date |
Remember to use a consistent format with all of your date fields. |
|
Transaction Type |
Refer to the list of recognized transaction types. |
|
Security Identifier |
Use a column for one of the following:
|
|
Security Type |
Security Type is required when importing cash transactions. For these rows, the Security Type should be listed as cash. All other security types may be left blank in the same spreadsheet. |
|
Transaction Identification |
Depending on the transaction type, you usually need columns for two of the following:
|
Why do I need to include both the client name and account number when importing from Excel?
When importing from Microsoft Excel, Morningstar Office maps accounts as “Account Number - Client Name” in the Definition Master. This format allows Morningstar Office to recognize accounts as existing accounts the next time you import. For this reason, it is vital that you include both the Account Number and Client Name as columns in your spreadsheet every time you import transactions using Excel.
If you exclude the Account Number column from your spreadsheet, the Account Name will be used in its place. If you exclude the Client Name column from your spreadsheet, the name of the Excel file will be used in its place. In this case, Morningstar Office maps accounts using “Account Number - File Name”. Subsequent import sessions using Account Number and Client Name columns will not be recognized, and you will need to remap your Accounts within the Definition Master.
What transaction types are recognized by Morningstar Office?
When you import data from Excel into Morningstar Office, one of the required columns is Transaction Type. If you type in one of the actual transaction types listed in the table below, you will not need to worry about mapping this action at the time of the import.
For example, in Excel, you should have a column labeled Transaction Type. In this column, each time a client makes a purchase of a security, you can type Buy. The system will recognize this, and it will import it correctly without further intervention from you.
Alternatively, you could type some other code in the Transaction Type column, such as a number or abbreviation. When you go to import the file, though, you will need to tell Morningstar Office which transaction type corresponds to each number or abbreviation.
Morningstar Office recognizes the following transaction types:
|
Accrued Interest |
Bought Distribution |
Redeem |
|
Accrued Interest |
Exchange-in |
Return of Principal |
|
Adjust Cost |
Exchange-out |
Sell |
|
Adjust Lot |
Expense |
Sell Short |
|
Buy |
Expire |
Sell to Pay Expense |
|
Cover Short |
Income |
Sell to Pay Fees |
|
Credit of Security |
Income Reinvest |
Short-term Capital Gain |
|
Debit of Security |
Interest |
Short-term Capital Gain Reinvest |
|
Deliver-in |
Long-term Capital Gain |
Split |
|
Deliver-out |
Long-term Capital Gain Reinvest |
Surrender |
|
Deposit |
Management Fee |
Tax Withheld |
|
Distribution |
Margin Interest |
Withdrawal |
Note: For Split transactions, you must indicate the number of shares by which the split increases or decreases the client’s current position. For example, if a stock with 50 shares splits 2:1 (to 100 shares total), the Split transaction should indicate 50 additional shares, not 100 total shares.
Additionally, each transaction type in the table above also has a reversal of that transaction type. You can enter this in Excel simply by using the convention: Reversal [transaction type]. For instance, if you wanted to reverse a Buy, you would type Reversal Buy.
Other transaction types also exist, but they should not be used. The following table suggestions transaction types not to use, and recommends a transaction type you can use in lieu of it:
|
Instead of this transaction type... |
Use this transaction type... |
|
Merge-in |
Credit of Security |
|
Merge-out |
Debit of Security |
|
Transfer-in |
Credit of Security or Deliver-in |
|
Transfer-out |
Debit of Security or Deliver-out |
|
Start Value |
Deliver-in |
Three transaction types can be used to account for cash income. See the following table to determine which transaction type to apply in each circumstance:
|
For this security type... |
Use this transaction type... |
|
Fixed Income and CDs |
Income |
|
Cash and Cash Equivalents |
Interest |
|
Mutual Funds, Stocks, etc. |
Distribution |
For more details about the different transaction types, and the securities to which they apply, please refer to the Transaction Types topic.
How do I upload my spreadsheet of transactions?
Before beginning this procedure, you should know that Morningstar Office uses a cash accounting methodology when handling transactions. For example, when a client buys a security, a corresponding “withdrawal from cash” event is recorded as well. Your spreadsheet, however, should not include any of these offsetting cash transactions.
Instead, these cash offsets will be automatically generated as part of this procedure. You should also realize that the source of cash used for the offsets will come from what is entered in your Definition Master (on the Securities page under the User Defined Securities folder at the top), or they will be entered as Out of Pocket transactions. If you have not already created the proper cash source for these transactions in the Definition Master, you should address that issue before proceeding.
Finally, in addition to mapping columns from the Excel spreadsheet to Morningstar Office and accounting for the necessary cash offsets for the transactions, this procedure allows you to do the following:
indicate the date format used for all date-related fields in the spreadsheet
tie the accounts being imported to accounts you previously imported for your practice from a custodian (thereby avoiding duplicate accounts), and
translate codes you used in the Excel spreadsheet for transaction types, to map them to Morningstar’s own transaction types.
Note: Click here to learn how you can use the Microsoft Excel import dialog box to save a template or retrieve a previously saved template of your spreadsheet mappings.
To upload an Excel spreadsheet containing transactions to Morningstar Office, do the following:
Open the Import window. From the toolbar at the top of Morningstar Office, click Import.
On the Import window, under the Interface Name column in the spreadsheet area, double-click Microsoft Excel - Transactions. The Import dialog box opens.
If you previously used this dialog box, and need to change any of the settings, be sure to click the Reset button at the bottom of the dialog box.
Along the left-hand side of the Import dialog box, you will see a list of four import categories (Client Information, Transaction Information, Security Information and Price Information). Each sub category must be mapped to Morningstar Office using a separate Excel Spreadsheet. Select the import category by placing a check in the corresponding box. To open the corresponding import mapping interface, click Transaction Information. The dialog box updates to reflect your choice.
From the Security ID Type drop-down field at the top of the dialog box, select the type of ID (such as CUSIP or ticker) being used in the Excel spreadsheet.
From the Date Format drop-down field, select the date format being used in the Excel spreadsheet.
If the Excel spreadsheet contains a descriptive header line (in row 1), check the File Contains Header Line box
Click the magnifying glass icon to the right of the File Name field to navigate to the location of the Excel file.
Use the Column field to map the data points in the Excel spreadsheet to the correct data point in the Name column. If the spreadsheet has a header row with column labels, these labels will be displayed for you in each Column drop-down field.
If you intend to import the transactions to an existing custodian account, click the Custodian drop-down field and select the custodian. Morningstar Office will use the account number in your spreadsheet to match those of accounts you have already imported from this custodian’s interface.
Cash offsets can be generated automatically by clicking the Add cash flows drop-down field and selecting Yes.
![]()
If you choose not to add cash flows (Add cash flows = No), then all of your transactions will be offset with an external cash flow (i.e., contributions to or distributions from a client’s account.)
To select the cash security you wish to use (from among those listed on the Securities page under the User Defined Securities folder in the Definition Master), click the magnifying glass icon next to the Default Cash field. The Add Default Cash Symbol dialog box opens.
From the Within drop-down field, select User Defined Cash.
To see all available options, click Go.
![]()
Select an option, then click OK to close the Add Default Cash Symbol dialog box.
If you used Morningstar’s transaction types in the spreadsheet, you can go to step 17. If you used codes to represent transaction types, continue with step 15.
Note: You must have entered the transaction types on the Excel spreadsheet exactly as they appear in the transaction types table. Any deviation from this will cause errors.
If you signified transaction types in the Excel spreadsheet using codes, rather than Morningstar’s transaction types, you need to map these codes to Morningstar’s transaction types. From the Transaction Type drop-down field, select an option.
In the Transaction Code(s) in Excel column, type the code from the spreadsheet.
![]()
Repeat steps 15-16 until all codes used in the spreadsheet have been mapped.
Click Import. The blotter window opens, where you can review the data before posting it to your accounts. To help you with the Import blotter, please refer to the Preparing to Import Data into Morningstar Office and Handling Warnings in the Import Blotter topics.
Note: On the Transactions page of the Blotter window, you might want to use the Specify Lot column for Sell transactions.
After confirming that the data in the blotters are correct, post your data by clicking the Post button on the toolbar at the top of the window.
In addition to transactional data, it is also possible to import security information into Morningstar Office via Microsoft Excel. Importing this information is similar to importing transactions. Note that pricing information related to these securities must be imported separately. Refer to the section on importing prices for more information.
You will learn the following:
what types of securities can be imported into Morningstar Office
what data points Morningstar recognizes when importing securities
what data points are required to import securities from Excel
how to use the Import blotter.
What types of securities can be imported into Morningstar Office?
The Security Information import blotter is used to import securities not recognized by Morningstar’s database, such as a Fixed Income security or a Hedge Fund. Once imported, the securities appear under the New User Defined securities sub blotter. After you post the securities to your practice, they reside within the Definition Master. Here, you can add additional information about your imported securities.
The following are recognized Morningstar security types:
|
Mutual Fund |
Separate Account |
Index |
Limited Partnership |
|
Stock |
VA |
Category |
529 Portfolio |
|
ETF |
VL |
Proxy |
Unit Investment Trust |
|
Closed End |
Cash |
Money Market |
Preferred Stock |
|
Fixed Income |
Other |
Objective |
Treasury Inflation-Protected |
|
Options |
Warrants and Rights |
Tangible Assets |
Insurance and Pension Funds |
|
CMO |
Mortgage-Backed |
Hedge Fund |
REITS |
|
CD |
|
|
|
What data points does Morningstar Office recognize when importing securities?
To import security information from Excel into Morningstar Office, be sure the spreadsheet contains only those data points which Morningstar Office can recognize. Morningstar Office recognizes the following data points for securities:
|
Base Currency |
Issue Date |
Security ID |
|
Day Type |
Issue Price |
Security Name |
|
First Coupon |
Maturity Date |
Security Type |
|
Interest Rate |
Moody Rating |
S&P Rating |
|
|
Payment Frequency |
Ticker |
What data points are required to import securities from Excel?
While most of the above data points are optional, a security identifier and security type are required when importing a security. A security identifier can be either a Ticker symbol or Security ID type. You must select the Security ID type from the Security ID type drop-down field before you begin importing. Your Security ID type can be one of the following:
CUSIP
Ticker
ISIN
SEDOL Code, or
MEX Code.
How do I import a spreadsheet of securities?
Note: Click here to learn how you can use the Microsoft Excel import dialog box to save a template or retrieve a previously saved template of your spreadsheet mappings.
To import an Excel spreadsheet containing securities to Morningstar Office, do the following:
Open the Import window. From the toolbar at the top of Morningstar Office, click Import.
On the Import window, under the Interface Name column in the spreadsheet area, double-click Microsoft Excel - Transactions. The Import dialog box opens.
If you previously used this dialog box, and need to change any of the settings, be sure to click the Reset button at the bottom of the dialog box.
Along the left-hand side of the Import dialog box, you will see a list of four import categories (Client Information, Transaction Information, Security Information and Price Information). Each sub category must be mapped to Morningstar Office using a separate Excel spreadsheet. Select the import category by placing a check in the corresponding box. To open the corresponding import mapping interface, click on Security Information. The dialog box updates to reflect your choice.
From the Security ID Type drop-down field at the top of the dialog box, select the type of ID (such as CUSIP or ticker) being used in the Excel spreadsheet.
From the Date Format drop-down field, select the date format being used in the Excel spreadsheet.
If the Excel spreadsheet contains a descriptive header line (in row 1), check the File Contains Header Line box.
Click the magnifying glass icon to the right of the File Name field to navigate to the location of the Excel file.
Use the Column field to map the data points in the Excel spreadsheet to the correct data point in the Name column. If the spreadsheet has a header row with column labels, these labels will be displayed for you in each Column drop-down field.
If you used the recognized Morningstar Security Types in the Excel spreadsheet, go to step 12. If you used codes to signify Security Types in the Excel spreadsheet rather than Morningstar’s security types, you need to map these codes to Morningstar’s security types.
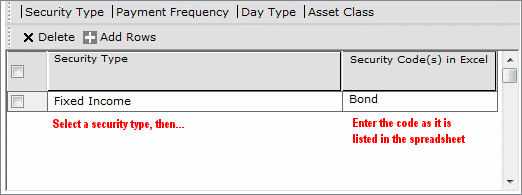
From the Security Type drop-down field, select an option. In the Security Code(s) in Excel column, type the code from the spreadsheet.
Repeat step 10 until all codes used in the spreadsheet have been mapped.
Click Import. The blotter window opens, where you can review the data before posting it to your accounts. To help you with the Import blotter, please refer to the Handling Warnings in the Import Blotter document.
After confirming that the data in the blotters are correct, post your data by clicking the Post button on the toolbar at the top of the window.
In addition to transactional data, it is also possible to import prices into Morningstar Office via Microsoft Excel. Importing this information is similar to importing transactions. Importing prices from Excel associates this information with a user-defined security in the Definition Master, and keeps you from having to enter this information manually.
In this section, you will learn the following:
what data points Morningstar recognizes when importing prices
how to use the Import blotter.
What data points does Morningstar Office recognize when importing prices?
In order to import price information contained in an Excel spreadsheet into Morningstar Office, you must be sure the spreadsheet contains the correct data points.
The following data points can be imported for a price:
As of Date
Price Factor
Price
Security ID
Security Name, and
Ticker.
What data points are required to import prices from Excel?
While most of the above data points are optional, a security identifier, Price and As Of Date are required when importing a price. A security identifier can be either a Ticker or Security ID type. You must select the Security ID type from the Security ID type dropdown field before you begin your import. Your Security ID type can be one of the following:
CUSIP
Ticker
ISIN
SEDOL Code, or
MEX Code.
Are there any security types for which I can’t import prices?
Other than Cash, prices can be set for all security types, including User Defined Securities. Cash is always set to 1, and does not require a price.
How do I upload my spreadsheet of prices?
Note: Click here to learn how you can use the Microsoft Excel import dialog box to save a template or retrieve a previously saved template of your spreadsheet mappings.
To upload an Excel spreadsheet containing prices to Morningstar Office, do the following:
Open the Import window. From the toolbar at the top of Morningstar Office, click Import.
On the Import window, under the Interface Name column in the spreadsheet area, double-click Microsoft Excel - Transactions. The Import dialog box opens.
If you previously used this dialog box, and need to change any of the settings, be sure to click the Reset button at the bottom of the dialog box.
Along the left-hand side of the Import dialog box, you will see a list of four import categories (Client Information, Transaction Information, Security Information and Price Information). Each sub category must be mapped to Morningstar Office using a separate Excel spreadsheet. Select the import category by placing a check in the corresponding box. To open the corresponding import mapping interface, click Price Information. The dialog box updates to reflect your choice.
From the Security ID Type drop-down field at the top of the dialog box, select the type of ID (such as CUSIP or ticker) being used in the Excel spreadsheet.
From the Date Format drop-down field, select the date format being used in the Excel spreadsheet.
If the Excel spreadsheet contains a descriptive header line (in row 1), check the File Contains Header Line box.
Click the magnifying glass icon to the right of the File Name field to navigate to the location of the Excel file.
Use the Column field to map the data points in the Excel spreadsheet to the correct data point in the Name column. If the spreadsheet has a header row with column labels, these labels will be displayed for you in each Column drop-down field.
Click Import. The blotter window opens, where you can review the data before posting it to your accounts. To help you with the Import blotter, please refer to the Handling Warnings in the Import Blotter document.
After confirming that the data in the blotters are correct, post your data by clicking the Post button on the toolbar at the top of the window.
In addition to transactional data, it is also possible to import Client Data into Morningstar Office via Microsoft Excel. Importing this information is similar to importing transactions.
Note: Importing client data applies only to new clients. Existing clients cannot be updated with new information using an import from Excel. Existing clients must be updated manually.
You will learn the following:
what data points Morningstar recognizes when importing client data
what data points are required to import client data from Excel
how to use the Import blotter.
What data points does Morningstar Office recognize when importing clients?
In order to import client information contained in an Excel spreadsheet into Morningstar Office, you must be sure the spreadsheet contains the correct data points.
The following data points are recognized when importing client information:
|
Address1 |
Country/Region |
Middle Name |
|
Address2 |
Date of Birth |
Relationship |
|
Address3 |
|
SSN/TIN |
|
Cell Phone |
Fax |
State/Province |
|
City |
Gender (F/M) |
Work Phone |
|
Client Name |
Home Phone |
Work Phone Extension |
|
Client Type (Individual/Institutional) |
Member Name |
Zip Code |
What data points are required to import client data from Excel?
While most of the above data points are optional, Client Name is required when importing client information. Client Name is how you identify a new client within the Clients page under the Client Management tab.
Note: If you enter a value in the Member Name column in your spreadsheet, then the Relationship column also becomes required.
How do I upload my spreadsheet of client data?
Note: Click here to learn how you can use the Microsoft Excel import dialog box to save a template or retrieve a previously saved template of your spreadsheet mappings.
To import an Excel spreadsheet containing client information to Morningstar Office, do the following:
Open the Import window. From the toolbar at the top of Morningstar Office, click Import.
On the Import window, under the Interface Name column in the spreadsheet area, double-click Microsoft Excel - Transactions. The Import dialog box opens.
If you previously used this dialog box, and need to change any of the settings, be sure to click the Reset button at the bottom of the dialog box.
Along the left-hand side of the Import dialog box, you will see a list of four import categories (Client Information, Transaction Information, Security Information and Price Information). Each sub category must be mapped to Morningstar Office using a separate Excel spreadsheet. Select the import category by placing a check in the corresponding box. To open the corresponding import mapping interface, click on Client Information. The dialog box updates to reflect your choice.
It is not necessary to make a selection under the Security ID Type option as it is not used in this import.
From the Date Format drop-down field, select the date format being used in the Excel spreadsheet.
If the Excel spreadsheet contains a descriptive header line (in row 1), check the File Contains Header Line box.
Click the magnifying glass icon to the right of the File Name field to navigate to the location of the Excel file.
Use the Column field to map the data points in the Excel spreadsheet to the correct data point in the Name column. If the spreadsheet has a header row with column labels, these labels will be displayed for you in each Column drop-down field.
Click Import. The blotter window opens, where you can review the data before posting it to your accounts. To help you with the Import blotter, please refer to the Handling Warnings in the Import Blotter document.
After confirming that the data in the blotters are correct, post your data by clicking the Post button on the toolbar at the top of the window.
This section explains how to import Research lists from Excel into Morningstar Office. After importing, these lists are found on the Investment Lists page under the Workspace tab.
Note: Securities not recognized by Morningstar cannot be imported.
What data points does Morningstar recognize when importing Research lists?
To import Research lists from Excel into Morningstar Office, the Excel spreadsheet must contain the correct information. A spreadsheet can contain securities from more than one universe (i.e., mutual funds, stocks, ETFs, etc.), but only one universe can be imported at a time, and different security types will be saved to separate lists.
The following data points are recognized when importing Research lists:
Ticker
Security ID, and
Security Name.
If Security Name is a column in the Excel spreadsheet, it must be accompanied by either Ticker or Security ID. The Security ID can be one of the following:
CUSIP
ISIN
Ticker
SEDOL Code, or
MEX Code.
How do I import a Research list from Excel?
To import a research list, do the following:
From the toolbar at the top of the Morningstar Office window, click Import. The Import window opens.
Double-click Microsoft Excel - Research Lists. The Import dialog box opens.
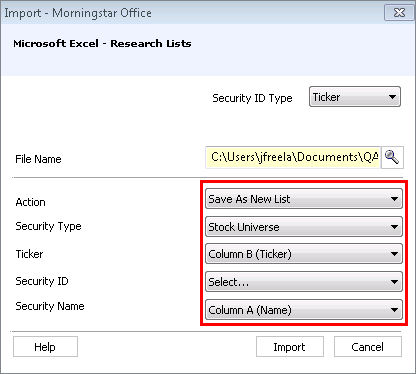
From the Security ID Type drop-down field at the top of the dialog box, select the type of ID (such as CUSIP or ticker) being used in the Excel spreadsheet.
Click the magnifying glass icon to the right of the File Name field to navigate to the location of the Excel file.
From the Action menu, select either Save As New List or Add to Existing List.
In the Security Type field, select the type of securities in your list.
If your spreadsheet used a Ticker column, identify it in the Ticker field.
If your spreadsheet used a Security ID column, identify it in the Security ID field.
If your spreadsheet used a Security Name column, identify it in the Security Name field.
Click Import. Follow the instructions below based on your selection of Save As New List or Add to Existing List.
If you chose Save As New List, the Save As dialog box opens.
In the Name field, type a name for the new list, then click OK. A confirmation message opens.
Click OK to clear the confirmation message.
If you chose Add to Existing List, the Add To dialog box opens.
Select the name of the existing list to which you want to add the items from the spreadsheet, then click OK.
A confirmation message opens, telling you how many securities were successfully added to the list. Click OK.
You can now view your list on the Investment Lists page of the Workspace tab.
This section describes how to import positions into Morningstar Office. Once imported, positions are entered as a quick account for the client(s) you reference in the interface mapping screen.
What data points does Morningstar recognize when importing positions?
To import positions from Excel into Morningstar Office, the Excel spreadsheet must contain the correct information. The following data points are recognized when importing positions:
Client name
Account number
Security name
Security type
As of date
Ticker
Security ID
Share quantity
Price, and
Market value.
The Security ID can be one of the following:
CUSIP
ISIN
Ticker
SEDOL Code, or
MEX Code.
How do I import positions from Excel?
To import positions, do the following:
From the toolbar at the top of the Morningstar Office window, click Import. The Import window opens.
Double-click Microsoft Excel - Positions. The Import dialog box opens.
From the Security ID Type drop-down field at the top of the dialog box, select the type of ID (such as CUSIP or ticker) being used in the Excel spreadsheet.
Click the magnifying glass icon to the right of the File Name field to navigate to the location of the Excel file.
If the Excel spreadsheet contains a descriptive header line (in row 1), check the File Contains Header Line box.
From the Date Format drop-down field, select the date format being used in the Excel spreadsheet.
For each drop-down field in the Import dialog box, select the corresponding column in the Excel spreadsheet for each item.

Click Import. The Quick Account blotter opens.
From the toolbar above the spreadsheet area, click the Post icon. A confirmation message appears.
Click OK to clear the confirmation message. The positions you imported can now be seen from the respective Client windows, or on the Accounts page under the Portfolio Management tab.
You can import new members (or update information for existing members) from Microsoft Excel into Morningstar Office. The Member Information import tool allows you to add members and information only for existing clients; you cannot use this tool to import new clients. To import new clients, you can use the Morningstar Excel - Transactions import interface.
This section covers the following topics:
what data points are required to import member information from Excel
what data points Morningstar recognizes when importing members from Excel, and
What is the relationship in Morningstar Office among clients, members, and contacts?
In Morningstar Office, it’s important to remember how clients, members and contacts are related to one another. First, each time a client is created, a member and contact record is created as well. (In this case, both the member and the contact will have the same first name and last name as the client.) Likewise, each time a member is created, a contact record is also created. Additionally, you can create contact records, which when explicitly linked to a client, also becomes a member of that client.
What data points are required to import member information from Excel?
While most member data points are optional, the following information is required when importing members:
the client name to whom the member record belongs
the full name of the member (entered as First Name, Last Name)
the first name and last name of the member(s) being imported (note that these items are separate from the item above, where the member’s full name must be entered), and
the relationship of the member to the client.
The following values can be used as a relationship:
|
Spouse |
Cousin |
Grandparent |
Partner |
|
Attorney |
Daughter |
Grandson |
Sister |
|
Accountant |
Dependent |
Insurance Agent |
Son |
|
Aunt |
Ex-Spouse |
Mother |
Trustee |
|
Beneficiary |
Father |
Niece |
Uncle |
|
Brother |
Friend |
Nephew |
|
|
Child |
Granddaughter |
Others |
|
What data points does Morningstar recognize when importing member information from Excel?
Over 60 different data points can be chosen when importing members into Morningstar Office. Note that only some of these data points apply to a member record. Some of them will insert or update information at the client level, and some will appear at the member level.
The following table details the information you can import via the Microsoft Excel - Member Import interface. As you review this information, keep the following important points in mind:
Required fields appear in bold under the Data Points column.
Some client-level data points apply only to institutional clients, and not individual clients, and vice versa. For example, an institutional client can have an Incorporated Date, but not an individual client.
If you import a data point that applies to a client (rather than a member), the Excel spreadsheet must include the Client name. Otherwise, the data point will not appear in Morningstar Office.
You can import values for user-defined data points you previously created on the Settings page under the Home tab in Morningstar Office.
|
Category |
Data Point |
Info appears at what level? |
Comment |
|
General Info |
Client Name |
Client |
This field is required when importing a member. You need to enter the full name of the client the member will be tied to. |
|
Client Rank |
Client |
This is a free-form text field; enter any content you wish. |
|
|
Client Report Name |
Client |
This is a free-form text field; enter any content you wish. |
|
|
Contract Signed Date |
Client |
This is a date field; be sure to use a consistent format for all date fields. |
|
|
Estate Planning Trust |
Client |
You should enter one of the following:
|
|
|
Estate Planning Will |
Client |
You should enter one of the following:
|
|
|
Incorporated Date |
Client |
This is a date field for institutional clients; be sure to use a consistent format for all date fields. |
|
|
Incorporated State |
Client |
This is a free-form text field for institutional clients; enter any content you wish. |
|
|
Institution Type |
Client |
This is for institutional clients. You should enter one of the following:
|
|
|
Referral Source |
Client |
You should enter one of the following:
|
|
|
Review Date |
Client |
This is a date field; be sure to use a consistent format for all date fields. |
|
|
Search Tags |
Client |
This is a free-form text field; enter any content you wish. |
|
|
Tax Id Type |
Client |
This is for institutional clients. You should enter one of the following:
|
|
|
Tax Id/SSN |
Client |
This is a free-form text field for institutional clients; enter any content you wish. |
|
|
US Corporation |
Client |
This is for institutional clients. You should enter one of the following:
|
|
|
Primary Member Info |
Birthday Date |
Member |
This is a date field; be sure to use a consistent format for all date fields. |
|
Desired Retirement Age |
Member |
This is a numerical field; enter up to three digits. |
|
|
Driver License Expiration Date |
Member |
This is a date field; be sure to use a consistent format for all date fields. |
|
|
Driver License State |
Member |
This is a free-form text field; enter any content you wish. |
|
|
Driver’s License |
Member |
This is a free-form text field; enter any content you wish. |
|
|
Employment Status |
Member |
You should enter one of the following:
|
|
|
First Name |
Member |
This field is required when importing a member. |
|
|
Gender |
Member |
You should enter one of the following:
|
|
|
Health Issues |
Member |
This is a free-form text field; enter any content you wish. |
|
|
Interests |
Member |
This is a free-form text field; enter any content you wish. |
|
|
Job Description |
Member |
This is a free-form text field; enter any content you wish. |
|
|
Last Name |
Member |
This field is required when importing a member. |
|
|
Marital Status |
Member |
You should enter one of the following:
|
|
|
Middle Name |
Member |
This is a free-form text field; enter any content you wish. |
|
|
Number of Years at Current Job |
Member |
This is a two-digit numerical field. |
|
|
Occupation |
Member |
This is a free-form text field; enter any content you wish. |
|
|
Prior Marriage |
Member |
This is a free-form text field; enter any content you wish. |
|
|
Relationship |
Member |
This field is required when importing members. You must identify the relationship between the member and the client the member is tied to. For examples of what to enter here, refer to this list. |
|
|
Role |
Client |
This field is for institutional clients. You should enter one of the following:
|
|
|
Smoker |
Member |
You should enter one of the following:
|
|
|
Social Security Number |
Member |
This is a free-form text field; enter any content you wish. |
|
|
Title |
Client |
This is a free-form text field for institutional clients; enter any content you wish. |
|
|
Wedding Anniversary |
Member |
This is a date field; be sure to use a consistent format for all date fields. |
|
|
Contact Info |
Address 1 |
Member |
This is a free-form text field; enter any content you wish. |
|
Address 2 |
Member |
This is a free-form text field; enter any content you wish. |
|
|
Address 3 |
Member |
This is a free-form text field; enter any content you wish. |
|
|
Cell Phone |
Member |
This is a numerical field. |
|
|
Cell Phone Allowance |
Client |
You should enter one of the following:
|
|
|
City |
Member |
This is a free-form field; enter any content you wish. |
|
|
Country/Region |
Member |
You must select USA, or leave blank. |
|
|
|
Member |
This is a free-form text field; be sure to include the @ sign, and a proper extension (i.e. .com, .net., etc.). |
|
|
E-Mail Allowance |
Client |
You should enter one of the following:
|
|
|
Fax |
Member |
This is a numerical field. |
|
|
Fax Allowance |
Client |
You should enter one of the following:
|
|
|
Home Phone |
Member |
This is a numerical field. |
|
|
Home Phone Allowance |
Client |
You should enter one of the following:
|
|
|
Institution Fax |
Client |
This is a numerical field. |
|
|
Institution Phone |
Client |
This is a numerical field for institutional clients. |
|
|
Mail Allowance |
Client |
You should enter one of the following:
|
|
|
Pager |
Member |
This is a numerical field. |
|
|
Pager Allowance |
Client |
You should enter one of the following:
|
|
|
Preferred Contact Method |
Client |
You should enter one of the following:
|
|
|
State/Province |
Member |
This is a free-form field; enter any content you wish. |
|
|
Work Phone |
Member |
This is a numerical field. |
|
|
Work Phone Allowance |
Client |
You should enter one of the following:
|
|
|
Work Phone Ext |
Member |
This is a numerical field, you can enter up to five numbers. |
|
|
Zip/Postal Code |
Member |
This is a numerical field. |
How do I import member information from Excel?
To import members, do the following:
On the toolbar at the top of the screen, click Import. The Import window opens.
Double-click Microsoft Excel - Member Import. The Import dialog box opens.
Click the magnifying glass icon to the right of the File Name field to navigate to the location of the Excel file.
If the Excel spreadsheet contains a descriptive header line (in row 1), check the File Contains Header Line box.
From the Date Format drop-down field, select the date format being used (if applicable) in the Excel spreadsheet.
Click the Add Data Point icon. The Select Data Points dialog box opens.
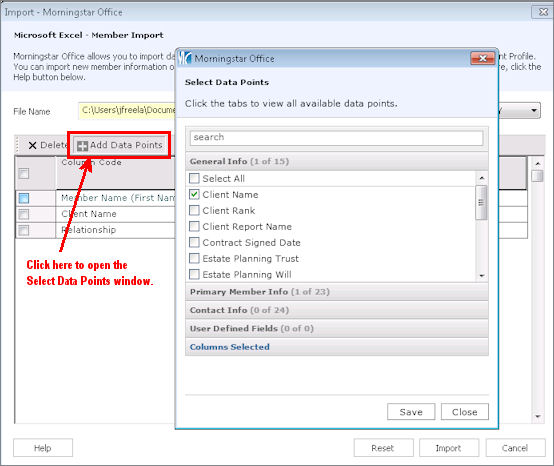
Use this dialog box to select the data points you wish to import. Remember that the Client Name field must be selected from the General Info tab, and First Name, Last Name, and Relationship must be selected on the Primary Member Info tab. You can use the Search field to find certain data points more quickly.
After selecting all of the data points you want to import from the Excel file, click Save.
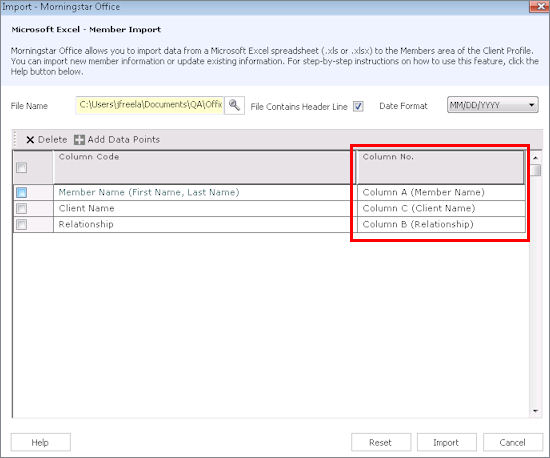
In the Column No. column in the Import dialog box, map the member information from the Column Code column to the corresponding column in the Excel spreadsheet.
Click Import. The Members blotter opens.
If no warnings appear in the Status column, click Post to add this information to your practice. Otherwise, you must address the issue noted in the warning.
When the warning message appears about information possibly being overwritten, click Yes.
When the confirmation message appears, click OK. You can now see the member information under the corresponding client record(s).
You can import investment notes from Microsoft Excel into Morningstar Office’s Note Manager feature. Investment notes relate to a security, such as recording a change in a fund’s manager. After importing investment notes, you can create a filter to search for certain ones.
The following topics are covered in this section:
what data points Morningstar Office recognizes when importing Investment Notes from Excel
what data points are required to import Investment Notes from Excel, and
What data points are recognized when importing investment notes?
The following data points can be included when importing investment notes from Excel:
|
Security ID |
Security Name |
Event Date |
Note Content |
|
Ticker |
Note Title |
Date Created |
Category |
Security ID can be one of the following:
CUSIP
ISIN
Ticker
SEDOL Code, or
MEX Code.
What data points are required to import investment notes?
While most of the data points described above are optional, the following are required when importing investment notes:
Security ID or Ticker
Note Title
Event Date, and
Security Name.
Note: If you do not provide a Category for each note you import, you will see a soft warning message in the Notes import blotter. This won’t prevent you from posting the data to Morningstar Office, but entering a Category can help you better manage your notes.
How do I import investment notes?
To import Investment Notes, do the following:
On the toolbar at the top of the screen, click Import. The Import window opens.
Double-click Microsoft Excel - Investment Notes. The Import dialog box opens.
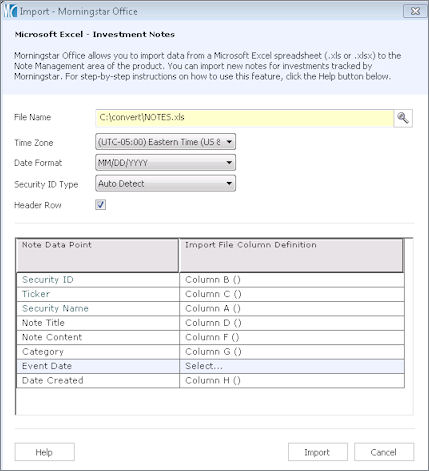
Click the magnifying glass icon to the right of the File Name field to navigate to the location of the Excel file.
Select the Time Zone for the notes.
Set the Date Format corresponding with the format for dates within the spreadsheet.
The Security ID Type defaults to Auto Detect, which scans the file for any of the available types. Use the drop-down field to select a specific format.
If the selected spreadsheet contains data in the first row, the system automatically selects the Header Row option. The column names are then shown as selections when mapping the file for import. If the file does not contain column headings, the first row should be blank (contains no data).
Use the Import File Column Definition drop-down field to map the data points to the corresponding spreadsheet column.
Click Import. The blotter window opens.
If no warnings appear in the Status column, click Post to add this information to your practice. Otherwise, you must address the issue noted in the warning.
When the confirmation message appears, click OK. You can now see the investment notes on any of the Note Manager pages.
This section describes how to assign a model portfolio that you have created to an account when importing from Excel. The following topics are covered in this section:
What are the benefits of associating a model portfolio to an account?
By associating a model portfolio to an account in Morningstar Office, you can generate the Current vs. Model Portfolio report. This can help you make rebalancing decisions for the account and client. For example, rather than simply automatically rebalancing all accounts, you can evaluate whether an account has become out of balance with a model, and by how much.
Making the association between a model portfolio and an account also allows you to rebalance a portfolio’s holdings to the model portfolio’s holdings, and generate a series of trade orders to be placed with your custodian. This avoids the manual work of having to figure out what positions need to be bought or sold in order to match an asset allocation and lineup.
What data points are required when assigning a model portfolio to an account?
The following data points are required when assigning a model portfolio to an account via import from Excel:
Account number, and
Morningstar Office model name.
How do I assign model portfolios to clients using Excel?
To assign a model portfolio to clients using Excel, do the following:
On the toolbar at the top of the screen, click Import. The Import window opens.
Double-click Microsoft Excel - Account Model Assignments. The Import dialog box opens.
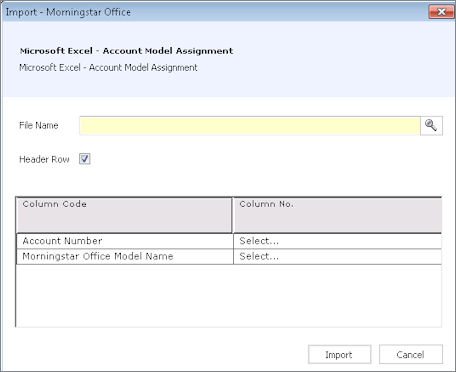
Click the magnifying glass icon to the right of the File Name field to navigate to the location of the Excel file.
If the selected spreadsheet contains data in the first row, the system automatically selects the Header Row option. The column names are then shown as selections when mapping the file for import. If the file does not contain column headings, the first row should be blank (contains no data).
In the Column No. column in the Import dialog box, map the information from the Column Code column to the corresponding column in the Excel spreadsheet.
Click Import. The blotter window opens.
If no warnings appear in the Status column, click Post to add this information to your practice. Otherwise, you must address the issue noted in the warning.
When the confirmation message appears, click OK. If you open one of the accounts (by double-clicking its name) to which you applied a model portfolio via import, you will now see this association in the Model Portfolio field of the Account Settings page. You can also see the association from the Portfolio Management tab. Go to the Accounts page, and choose the Account Settings option from the View drop-down field above the spreadsheet area. The Model Portfolio column is included here.
 See Also
Preparing to Import Data into Morningstar Office
Handling Warnings in the Import Blotter
Importing from Excel for Fidelity Wealth Central